who am I and how did I get started?

First and foremost, Up until recently I thought I was just a normal guy who thinks outside the box for the most part. My father (God rest his soul) Always said, Chris looks at things different. If there is a glass on a table some people would say, “That glass is half full.” others would say, “That glass is half empty”.. “Chris will walk up and ask, What’s the hell is in the glass?”.

 Recently during treatment I was diagnosed with Asperger’s Syndrome, which is a high functioning form of Autism. It really opened my eyes as to who I was, and why I am the way I am. Now you can understand the rest of my story a little more clearly.
I’m originally from Durham NC, When I graduated from Orange High School in 1990, I had a chance to go to art school and turned it down, because even though I was well above average in all facets of art, I did not enjoy it. I didn’t understand at the time it was a gift from God and that it should be used. I was voted “Best Senior artist” in a very large school, my senior year.
I’ve always been able to do any type of medium from pencil, paint, airbrush to sculpting with clay.. I was always artistic in some way. I got it from my Mother’s side of the family. My mother was very artistic and good singer also, as well as other members on my Mother’s side of the family. So instead of Art school I went into the Navy at 18 and did 4 years with an honorable discharge.
I apparently tested off the charts in mechanical ability on my ASVAB because it wasn’t long before all the branches were calling me to be a mechanic. I got that from My Father’s side. They could always fix anything or build anything, and so can I.
I chose the Navy mostly because of the movie”Top Gun”. I wont lie about it! Also because My Father was in the Navy too. I joined in 1990. I was a Mechanic / Power Plant operator, until I got out in 1994, which has been the only regret I’ve ever had in my life. It was a love I have never forgotten. When I got out of the Navy, I went to work as mechanic on big trucks at Ryder Truck Company in Garner NC for about a year, before I was offered a job in start up of a cutting edge power plant. 

I moved to Fayetteville in 1995 to take that job. This job is where I found out I had a knack for inventing. On two projects I helped invent two low cost items to improve stability of the plant and save tons of money in the long run. After two years of working there, the plant lost funding, and was cut up and sent overseas, and Everyone from the plant manager down was walked to the gate.
I worked other power plants for a short time after that and even though the money was outstanding the job was unstable due to regulations of the government on power plants. So I decided to go back to being a Mechanic, where I’ve always had a knack for troubleshooting. I went to work for Abbott laboratories as a robotic technician and once again found I had a knack for understanding how things work and how to make them better. I invented two items while at Abbott, that were patented by Abbot laboratories in robotics operations. I quickly advanced and became a name changer of the machines I was in charge of, So I thought. Until one week they brought in a group of 20 people that they wanted me to train on how to use the machines and work on them. Little did I know why at the time. They were all from Puerto Rico and very nice and learned super fast.
Two months later, Abbott gave everyone notice that the plant was shutting down and going over seas.. 

Once again, I was laid off. I was offered a job to go overseas and turned it down basically because I love home too much to leave. Although I traveled the world in the Navy, and loved it, I could not see myself living nowhere else but in the USA. I quickly found a job being a mechanic once again at a paving company. Then 9/11 Happened! I decided Then, I would go back into the Navy to help my country one more time.. But My wife at the time was not having it! She did not want me to be gone for 6 and 7 months at a time. She then convinced me to do something in civil service, so I could still answer my call of duty. So I decided to become a Career fire fighter.

In March of 2003 I was hired into The Fayetteville Fire Department, which I am very proud to be a member of still today. I only work 10 days a month for 24 hour shifts. I am a EMT/ Fire fighter, but being I have 20 days off a month on average, I decided to join a band as a lead singer in my spare time. It was then I found myself wanting a microphone that looked good but sounded great and just could not get what I wanted. I felt it was unfair that a bassist, drummer and guitarist could have any color instrument they wanted and any style but a singer could not.
They just offered the same old, same old, dull and run of the mill microphone. They sounded good but had no style! I then did stumble across a Shure 55SHII which, I thought looked great, but when I got it home and starting gigging with it, I found it lacking quality in sound to say the least, especially being I was used to the sound quality of a SM58. 

I tried buying a few elements online that said they sounded like a SM58, but when I got them, they also sounded like crap! So I decided to build my own. I pulled apart my 55SHII and my SM58 to see all the insides and how they worked. That’s when I found that the 55SHII has the upper diaphragm of a Shure SM58 microphone but no step up transformer and no resonance chamber. No wonder they sounded like crap! 5 or so prototypes later I built a great sounding 55SHII but with the completed SM58 inside. 

I loved my first finished microphone so much, I thought others should also have one too, so I started selling them on Ebay. Little did I know in that moment Mutant Mics was born. So in early 2008 I sent my early design to Shure Inc applications division. They were nice enough to take a look at it and sent it back with the statement to this day boggles me. “Sorry, but we are not into building hybrids” as they called it way back then. They suggested I start building them and selling them myself. Which by that time, I had been doing already for 2 years mostly upgrade old vintage mics I would by online, and upgrade them.. Funny thing was while my mic was off in the mail to Shure, I started practicing with a Shure 58 beta stock microphone, and fell in love with the sound of it. I could not believe the difference in sound quality and how much better it sounded than the SM58 design, I built for my 55. 

I couldn’t wait for my 55 to come back home so I could modify it again! I started building my new design with the 58 beta installed in March of 2008 in my first black and red 55, called the Sith, named after Darth Maul in the Star Wars movies.. Now the fun begins 2009 Shure came out with a Super 55 with a 58 beta element very similar to my first design. Then in 2010 they released the Black and Red limited edition, which by now was my number one seller and had sold over 50 versions of it by then.. 

My first thought was What happened to “Sorry, but we are not into building Hybrids”? And next question was “Who works at Shure that is trolling my webpage? I guess I will never know, but If someone at Shure is trolling my webpage, I am sure that in the future they will release a new Fatboy version like mine, Then come out with a 55 with an 87 beta inside, like mine, next come out with screens you can change out in any color like mine, and last offer a custom microphones at request, like I offer! But I’m just a little man building one mic at a time, what do I know? They are a big corporation that can build thousands at a time, but apparently out of ideas. 

But I will not talk bad about Shure, I absolutely love their products, service, and sound quality. If it wasn’t for Shure Inc. I would have never got started in the first place, And if it wasn’t for them being a BIG corporation and not one on one, with a client, Like me, I would not be doing what I’m doing now. Now 3800+ mics later, with new and upgraded designs coming monthly, I still do all my builds myself, I do all my own web design, updating, one on one customer emailing, I do all my art designs, testing and labor myself. I do all my own repairs and and support also. I do all the paint jobs myself. And last, I do all my packaging and mailing ordering of parts and inventory. So I guess there is a “i” in TEAM after all.. Just look at the negative space inside the A! That’s right a dotted i. The only thing I do not do with these mics and I outsource, is Chrome plating and color chrome, and powder coating. 

So please understand when I say it may be a few weeks to a month before you get a mic you understand why.. Well that is the short of who I am, and how I got started doing this, and in my opinion its the long, So Thanks for reading. 

Sincerely, Chris.

see description of each light below. Note the lights even though may not show it in the picture are listed from brightest to dimmest with number 1 being the brightest and #10 being the dimmest. Also the colors may not be exact so read explantion for each.

  • #1 Arc white. Arc white is the same color as lighting with a slightly bluish purple tint. I call it arc white because it is the same color as an electrical arc. it is the brightest I have and not quite as bright as in this picture.
  • #2 is green and is about the same color as my lettering on my site.
  • #3 is bright blue. it is almost a Carolina blue or light blue but is brighter than the dark blue #4.
  • #4 Dark blue this is the one on the picture above. slightly darker and dimmer than #3
  • #5 natural white light. this may look yellow in color here but it is the exact same color as a light bulb in the house. but not as bright.
  • #6 is Pink… a very nice hot pink and pretty bright.. I actually think this is one of my favorites..
  • #7 red…. this is when the lights are starting to dim in color.. but still are about as bright as a Jack-o-lantern at Halloween or a cigarette lighter.
  • #8 UV or purple. this is the exact same color and brightness as a black light like at a club.. if you are a singer with fluorescent contacts or face paint this color is for you it will make them glow in the dark.
  • #9 amber or yellow one of the dimmest and has a yellow tint. reminds me of an old antique light.
  • #10. is orange and its the dimmest of the bunch for just a hair of effect without to much attention…. reminds me of an old antique light…yellow and orange both do…

Next is the Lighted LED mics. This is an option you can get added to your newer elements. it will not work with the vintage elements. But if you are upgrading with me to a new element even the 87 beta, I can add lights to your mic for 50.00. You will need an XLR connector or have me change the mic over to XLR for you, because these lights run off phantom power from the sound board. If your board does not have phantom power you can order a portable plug in or battery operated version for around 25.00 on Ebay. There are Many LED colors to choose from and they are listed below with a explanation of each.

  • #1 is Shiny Green. this is close to a aluminum foil shiny but green….. kind of looks metallic.
  • #2 is Flame screen. its black with the shiny metallic looking flames that are gold and red… this is a limited version for now. and the flames will block the lights but i can do a siloutte with them as seen in past projects.
  • #3 is Pearl shimmer. its very see through but has a pearl effect in the light with colors of pink blue purple and white according to how the light hits it. Much like a dragonfly wing. this color works well under other colors for effect.
  • #4 is Blue Red Camelion. its basically like a blue see through color but at angles and in lights reflects back between a very shiny blue and red works well over other colors, Like #1 or shiny golds (which I can get but don’t have).
  • #5 plain purple.. no shine.
  • #6 Plain red, No shine almost the color of blood. and a little more burgandy than in the picture. also my stock red color for vintage mics.
  • #7 Pain Blue, no shine and almost the same color as stock blue for vintage mics.. a little darker than in the picture.
  • #8 Is mesh. its actually aluminum mesh and it looks great over other colors, but can over power a color and looks best over black and white. Meaning certain colors do not show up very well under the mesh.
  • #9 is Lime green shimmer. is see through and has strands that shimmer and make it look shiny. but for the most part is the color of a lime. looks well over and under colors for effect.
  • #10 blue shimmer, is see through and looks well doubled up or over other colors like red for a neat two color effect. is lighter in color than #11.
  • #11 dark blue shimmer. this is see through but when doubled up is the exact same color as the blue in a stock Super 55. it does have a glimmer effect and looks better with the chrome mic than the stock super 55… very very nice. there is one on the welcome page.
  • #12 bright red shimmer. this is the exact polar opposite as the #11 blue. a very bright red shimmer that is see through and looks well doubled up or over other colors like blue.
  • #13 Off red shimmer. almost has a purple pinkish look in the light but is slightly off red. this color is awesome over blue.. you can see this effect in the two chrome mics lying down side by side on My 55 design page
  • #14 wine shimmer. this is a odd color and material. it almost has a shiny orange look in the light and dark red when doubled up. it has a very unique look over black to give a dark look but with an eye catching effect.
  • #15 is plain white. white does work best with all lighted colors being it spreads the light out and does not tint the LED’s down. But does not look that well when not let…But you can added the mesh screen over it to change the look when the lights are off.
  • #16 Black. #16 is not shown because everybody knows what black looks like…
  • (Note) all the colors above work well with the lighted mics, but the darker the color or the more layers you use you will lose some of the brightness of the lights… take that into consideration when choosing lights, because the lights all have different brightness as well… (see the notes under lights below.)

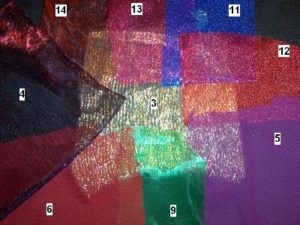
These next three pictures are just a few of the combinations I have for your choice in screen colors. If you don’t see something here you like check my past projects, or just tell me I may have the color or design already, that you will love. But for now, look at the number next to each color and read the write up I have about each one below these pics. It gives you insight and whether or not they can be used with lighted mics also.

You can even over lap colors for different effects
or choose the screen mesh with a color under it.

Next is one of the biggest and best designs I have. That’s replacement screens for your 55’s. I can do them for Small 55, fatboys 55’s and many other mics from way back! So lets say your old silk or foam in your 55 is rotten, missing, needs replacing or you just want to change the colors. Well I can do them a few options for you. One is you can send me the mic and I can replace it back to original. But if its a silk or cloth screen you are looking at around 30.00 to replace it. If its is foam, I can do it a little cheaper. and even do it free on a refurbish of the entire mic.. But lets say you want a custom color, and you don’t want to mail me the mic being you live on the other side of the planet or you need the mic for gigs. Well then My preformed screens are the answer. I can make you a custom screen in just about any color you like, that already has the shape of the inside of your mic and can change out in about 5 minutes with just a couple of screw drivers. Most are only 20.00 plus shipping. The fat boys are a little more around 30.00.

Another design I have is called the hard mounted XLR. I have them in black and in silver. they are gold pin XLR by switch craft and top of the line quality. These old vintage cords and connectors are hard to find and wear out over the years. So I designed a wired in, screwed in, version of a modern standard connector called the XLR. I can add it to just about any mic or I can even add it to old switch boxes too. And for a fraction of the cost of a vintage cord, they are only 25.00 to add to the mic. From that point on you can use any XLR standard cord. Now I do have a friend name Bob on my friends list who sales and adapter that just screws on, that he can just mail to you. He sales these for around 40.00, see his link two pictures below this one.. If rewiring your mic or changing the look of your mic is not something you would like to do.. Contact my friend Bob Beck and get one of his Quick change over adapters check out his products in the picture below. You can email him at bbeck81@bellsouth.net or look for his products on Ebay by going to his store. His Username there is bluetraderbob. Tell him Mutant Mics Sent you!
(see above for discription)

Next is what I like to call upgrade kits. I have My own design of what I call an upgrade kit for your mics. Over the years I have learned how to make them fit many mics, and have around 5 elements I can do. But not all will fit in every mic, so email me to see what may best suit your needs with the mic you have. The elements I have converted to fit different mics are as follows.  the Shure SM58, the Beta 58, the Beta 87, the R115 Modified. (the element in the 55SHII hot rodded to sound much better) and the Super 55 elements (which I have also made sound better). And Last I have recently converted the KSM9 and can get them to fit in a bigger mics like 55 Fatboy, a Turner 101, and EV726 shape mics.  When I say converted or “re-designed”, that’s what I mean. All these elements have designs in them that effect sound. Such as the SM58’s and Beta 58’s have a resonance chambers in the handle that make them sound the way they do. Without them, it will not sound the same. So just putting the element in a shell, is not what I’ve done nor will copy catting get the same effect. You will notice I do not show the backs or the insides for this reason. My designs are also made to where if you pull them apart, it will destroy the mic. So I wouldn’t suggest Buying one in hopes of reverse engineering it, unless you have the money to spare. :)

If you don’t have a shell of a mic and you are looking to buy a full finished Hybrid, Mutant Mic, email me I always have some type of shells lying around I can fix up for you.

And last is Chrome Plated. I also have this outsourced. Chrome plated is the real deal. Its where the mic is dipped in acid and all old chrome removed and new chrome is applied by electrolysis. This is a long process and expensive. It is the toughest finish with the least amount of maintenance. This can be done in real copper, nickle, gold and brass and even in brushed nickle like above. Depending on which finish you choose it can be around 200.00 to 300.00 for most mics and gold can be much much higher depending on the mic size and price of gold at the time..

Cosmi Color Chrome This is a process I have a company do for me. Its basically a tough plastic coating of chrome color that you can put on just about anything. you can get this in many colors also. This process is not perfect. The mics look great but they may have small runs or build up in small places and will not be perfect.. But this is the only way to get colored chrome and its not a very expensive process,170.00 per mic with shipping included.. 

For a look at my powder coating and colors write me at whoizitcc69@aol.com This is too new and I dont have many pics to post, so I can send you pics of what I do have.

There are 3 per mic and go here. If your mic has a rattle to it inside these are the problem. They are 10.00 for the set of 3 Choice of Chrome. I have 2 ways to chrome a mic and they have different pricing. One way is chrome plating.. Chrome Plating is just like the old chrome bumpers and cost around 200.00 to do for a small mic like a 55s or smaller depending on the details and condition. They are 300.00 for a big mic like an fatboy, EV726 or Turner 101A, EL6030. Another way to chrome is Cosmi chrome, I do not make any profit on either of these they are an out sourced item… Cosmi chrome is a liquid spray. They charge around 200.00 with shipping, but it can come in colors and be done on plastic or metal. And last I can powder coat microphones to just about any color you can think of from flat to gloss shine. I charge 100.00 to 125.00 to powder coat mics, for one color and it goes up according to multiple colors.

A new product I’m offering came about do to the high volume of questions for them. and that’s new element Shock mounts for vintage 55s in the small style not the Fatboys. but the 55s 55sw, PE55 or 556s. I finally completed a permanent mold for them and found a product that works very well form Polytek.. It fairly expensive though I have to charge a little more for a set of 3 than I would like. The good news is they will last forever, and not effected by water, hot or cold. and stay spongy. they do come in the original black color and are better fitted than the original ones Shure made out of foam back in the day.